A Photographer’s Guide to Documenting Heating and Plumbing Installations
Every building, whether old or new, hides an intricate network of pipes and heating systems behind its walls. These installations tell stories of design, craftsmanship, and functionality. For photographers, they offer more than just technical fascination—they offer a unique visual narrative worth capturing.
Photographing plumbing and heating installations is not just about snapping images of pipes. It’s about documenting progress, showing precision, and revealing transformation. Whether you’re shooting for a construction company, a home renovation project, or creating visual content for tradespeople, understanding how to approach this type of work can turn routine shots into compelling visual stories. This is especially true when capturing specialized services like unblocking services in Wavre (debouchage wavre), where detail and clarity matter as much as creativity.
Understanding the Subject: More Than Just Pipes
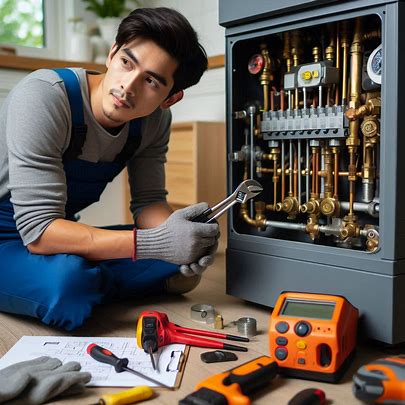 Before clicking the shutter, take time to understand what you’re photographing. Heating and plumbing systems include a mix of visible and hidden elements—pipes, valves, radiators, boilers, underfloor heating grids, and ventilation ducts. Each has its own story, from how it’s installed to the function it serves. Learn the names of parts, ask questions, and study the setup before photographing it. This knowledge helps frame better, more meaningful shots.
Gear and Settings That Make a Difference
A good DSLR or mirrorless camera with a wide-angle lens is a solid start. Many plumbing and heating setups are installed in tight or narrow areas. A wide-angle lens will help capture the full setup, even in cramped basements or utility rooms. Macro lenses are excellent for zooming in on intricate details, such as the threading on a pipe or the finish on a valve.
Use manual settings for better control over exposure and depth of field. These systems are usually metallic and reflective. Play around with lighting and avoid flash when possible—it can cause unwanted glare. A portable LED panel with adjustable brightness will let you shape the lighting to your advantage.
Lighting Matters More Than You Think
Most plumbing installations are in low-light environments. Relying on natural light may not be possible. Bring your own light source, but avoid harsh lighting that flattens the image. Soft, directional lighting works best. It helps define the shapes and textures of pipes and gives a sense of depth to the scene.
Try side-lighting to accentuate the curves and edges of metallic surfaces. Use reflectors or bounce cards if necessary to brighten dark corners without overexposing the main subject.
Documenting the Process
Don’t limit your shots to the finished installation. Capture the process from start to finish. Take photos of the empty space, the work-in-progress, and the final look. This visual timeline is valuable for contractors, clients, and future maintenance work.
Include people in some shots, such as installers working, tools in hand, and technicians testing systems. These action shots bring the installation process to life and give viewers a better understanding of the scale and complexity of the job.
Angles, Details, and Composition
Straight-on shots are great for showing layout and structure, but don’t be afraid to experiment. Shoot from above to capture patterns in underfloor heating or take close-ups of detailed connections between pipes. Use leading lines to guide the viewer’s eye through the frame.
Focus on symmetry when possible. Many installations are designed with precision and balance. Highlight that. A neatly installed row of copper pipes can look like a work of industrial art when framed properly.
Post-Processing and Final Touches
Keep edits clean and realistic. Adjust brightness, contrast, and color balance to enhance clarity, but don’t go overboard. These photos are often used for professional or technical purposes. Sharpness and accuracy are more important than artistic filters.
If you’re creating a photo series, keep the edits consistent across all images. This helps maintain a professional look and feel, especially for portfolios or marketing materials.
Safety and Respect on Site
Always follow safety guidelines when photographing on construction or installation sites. Wear appropriate gear, and don’t interfere with ongoing work. Respect the space and the tradespeople who are focused on their tasks. Be quick, efficient, and communicative.
Final Thoughts
Plumbing and heating photography is more than a niche—it’s an opportunity to show craftsmanship through your lens. With the right approach, tools, and mindset, you can turn what most people overlook into something worth framing. Whether a new installation’s precision or a space’s transformation, your camera can bring it all to life.