
How to Photograph Rental Musical Instruments for Online Catalogs and Educational Programs
High-quality product photography plays a vital role in helping families, students, and educators evaluate musical instruments before making rental decisions. Research from Google shows that clear product images strongly influence online purchasing behavior because they help users build confidence in what they are viewing. When rental programs present accurate, detailed photographs, visitors can compare instrument condition, craftsmanship, and included accessories with greater ease.
Clear photography becomes even more valuable for location-based online catalogs that organize inventory by region. For example, a page featuring violin rental Austin can benefit from consistent, well-lit images that help parents and students understand what to expect before arranging a rental. Instead of relying solely on written descriptions, detailed photographs provide visual confirmation of an instrument’s appearance, features, and overall condition.
The Challenge of Photographing Rental Instruments
Rental instruments differ from brand-new retail products. Many have been used by previous students while remaining professionally maintained. Families want honest representations rather than heavily edited images that hide normal signs of careful use.
Experts from the National Association of Music Merchants (NAMM) note that trust remains one of the most important factors when serving beginning musicians and school music programs. Accurate product presentation helps build that trust, especially when customers cannot inspect an instrument in person.
The goal is simple. Show every instrument clearly while maintaining a professional and consistent appearance throughout the catalog.
Step 1: Prepare Every Instrument Carefully
Good photography starts before the camera comes out. Dust, fingerprints, and misplaced accessories become much more noticeable in high-resolution photographs.
Before each session:
- Clean the instrument using appropriate materials.
- Polish metal fittings if recommended by the manufacturer.
- Align strings, bridges, and bows correctly.
- Check that cases and accessories are complete.
- Remove distracting labels or temporary inventory stickers when possible.
The Smithsonian National Museum of American History emphasizes careful handling and proper maintenance of musical instruments to preserve their condition. Those same practices improve photographic results.
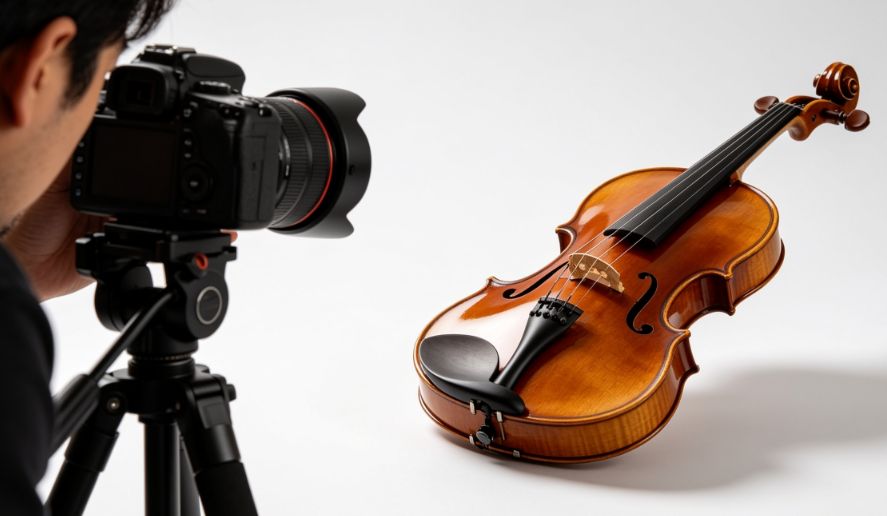
Step 2: Use Soft, Even Lighting
Lighting often determines whether an image looks professional or amateur. Strong direct flash creates harsh reflections on varnished wood, polished brass, and lacquered finishes.
Soft, diffused lighting produces much better results. Many photographers use two softboxes positioned on either side of the instrument. Large windows with indirect daylight can also work well if lighting remains consistent throughout the session.
Avoid mixed lighting sources because different color temperatures may create unrealistic wood tones. Accurate colors matter when families compare instruments online.
Guidance published by Adobe highlights soft lighting as one of the most effective ways to reduce glare and preserve realistic product colors.
Step 3: Choose Clean Backgrounds
Simple backgrounds keep attention on the instrument. White, light gray, or neutral-colored backgrounds work well for online catalogs because they create consistency across every product page.
A seamless paper backdrop or clean photography table prevents distracting lines and shadows. Backgrounds should complement the instrument instead of competing with it.
Consistency becomes especially important when a catalog contains dozens or even hundreds of rental instruments.
Step 4: Create Standard Viewing Angles
Every instrument should be photographed using the same sequence of views. Standardization helps users compare products without visual confusion.
For string instruments, consider photographing:
- Full front view
- Full back view
- Side profile
- Scroll and pegbox
- Bridge and strings
- Fingerboard
- Bow
- Carrying case
Wind and brass instruments benefit from similar consistency, including full-length views and close-ups of keys, valves, mouthpieces, and important mechanisms.
Step 5: Capture Important Close-Up Details
Wide photographs provide an overall impression, while close-up images answer practical questions.
Parents often want to inspect:
- Bridge alignment
- Fingerboard condition
- Tuning pegs
- Fine tuners
- Case interior
- Included accessories
Detailed photographs reduce uncertainty and can lower the number of customer questions before completing a rental request.
Reports from Baymard Institute indicate that detailed product visuals help consumers make more informed online decisions by reducing uncertainty during the evaluation process.
Step 6: Keep Every Image Consistent
Consistency creates a professional online catalog.
Use identical camera settings whenever possible. Keep the same background, lighting setup, camera height, and image dimensions for every product. Crop images uniformly so each instrument appears centered and proportionate.
Editing should remain minimal. Adjust exposure, white balance, and sharpness while avoiding excessive retouching that changes the instrument’s true appearance.
Families appreciate realistic photographs because they closely match the instrument they eventually receive.
Step 7: Optimize Images for Online Viewing
Large image files can slow website performance. Research from Google PageSpeed Insights shows that faster-loading pages improve user experience and encourage visitors to continue browsing.
Export photographs in web-friendly formats while maintaining sufficient resolution for zoom functionality. Include descriptive filenames and informative alternative text so images remain accessible for users who rely on screen readers.
The World Wide Web Consortium (W3C) recommends meaningful alternative text to improve digital accessibility for all users.
Supporting Educational Programs Through Better Photography
School music programs often recommend rental providers to families beginning their musical journey. Well-organized online catalogs allow teachers, parents, and students to review available instruments before selecting an appropriate option. Many of the same professional photography techniques used to capture memorable indoor experiences can also improve the way musical instruments are presented, emphasizing accurate lighting, thoughtful composition, and visual storytelling that helps viewers make informed decisions.
Accurate photography supports this educational process by presenting each instrument honestly. Teachers can reference images during lessons, parents can compare available sizes and accessories, and students gain greater confidence before receiving their first instrument.
Clear visuals also reduce misunderstandings about included equipment, helping rental providers communicate expectations more effectively.
Conclusion
Professional instrument photography combines preparation, careful lighting, thoughtful composition, consistent presentation, and honest representation. Every image should answer common customer questions while accurately reflecting the instrument’s actual condition.
As more families and schools rely on online catalogs to compare rental options, photography continues to serve as an important bridge between digital browsing and real-world musical experiences. Following a structured workflow helps create catalogs that are informative, trustworthy, and easy to navigate, making the rental process smoother for students, educators, and parents alike.
 Professional junk removal can help you to create beautiful family photography settings. In family photography, moments will happen naturally in the home itself. But for busy households, there can be items that pile up, and make spaces feel too full and cluttered.


 This trend remains popular on Instagram since it presents the entire spread.
 Before clicking the shutter, take time to understand what you’re photographing. Heating and plumbing systems include a mix of visible and hidden elements—pipes, valves, radiators, boilers, underfloor heating grids, and ventilation ducts. Each has its own story, from how it’s installed to the function it serves. Learn the names of parts, ask questions, and study the setup before photographing it. This knowledge helps frame better, more meaningful shots.

 Photography is as much about creativity as it is about having reliable equipment. Studio tools such as lighting systems, cameras, and power supplies require consistent performance to produce stunning results. Equipment malfunctions during a shoot can disrupt workflows, cost valuable time, and damage your reputation. Preventative maintenance ensures your studio operates smoothly, allowing you to focus on your craft.

 Resting your sleeping baby’s head on your palms while they sleep will give them a more serene appearance, creating the Chin-on-Hands Pose. Their delicate features and calm demeanor are emphasized by this position.
 Relocating to a new place can be both exciting and less stressful with Experia moving. While the prospect of a fresh start is thrilling, the logistics of moving can be overwhelming. Amidst the chaos, photography serves as a powerful tool to capture the bittersweet moments of leaving an old home and embracing a new one.